Monday, September 27, 2010

Pane all'Olive--Olive Bread

Pane all'Olive--Olive Bread


Several recipes in Jim Lahey's "My Bread" book have grabbed my attention.  Just looking at this olive bread recipe got my kalamata olive cravings going.  After a week of the cravings, this loaf just screamed "make me!"

For this bread, I used an 11.5 jar of kalamata olives.  It was just short of the amount in the recipe, but I wasn't going to go back to the store for another jar.  It was just enough, in my opinion.

Of  course, it was a very wet and easy to mix dough.     Here's a shot of the dough, after 5 hours of rising.  Notice the nice bubbles forming!


After quite a bit of research, I bought a 3.5qt Tramontina enameled cast iron dutch oven.  The 6qt size was just too heavy for me, even without the dough inside.  Mr. Lahey must be very strong, as he suggests the larger pots!  For this first use, the knob was covered in foil because it wasn't oven safe at 450 degrees.  Since then, the knob was replaced with a stainless steel knob.
The First Use of My Tramontina Enameled Cast Iron Dutch Oven!!!


The Pot, After it Was Seasoned...

Using my new enameled cast iron pot was really exciting.  I did a test where I tried to make a similar bread without a cast iron pot. Jim Lahey recipe--testing different baking methods.
The results varied when Corningware and a baking stone were used. So I was excited to try Jim Lahey's suggested method.


Although the recipe called for the bread to be baked at 500 degrees, my pot is ovensafe to 450 degrees.  My Ove Glove mits are ovensafe to 450 degrees.  Cooking at 500 degrees and manipulating a pot can have some anxiety.  So the temperature used was 450 degrees.  

The bread was just great, but it probably needs to be baked a bit longer at 450 degrees.  Although the digital thermometer registered that the bread was done, it was a bit gummy in the middle.  I'll have to make sure to take the temperature reading in the middle next time.

Definitely a "keeper" recipe, and it filled my olive craving!  I already have my eye on his walnut bread recipe....

Jim Lahey's Recipe, Pane all'Olive


 Handwise tips:  If you have hand pain, tendonitis, or arthritis or any other pain issues and want to make this recipe,
Using my Vidalia Chop Wizard
great measurements!
  1. Rather than chop the olives on a cutting board or cutting them with a scissors, I used my Vidalia Chop Wizard. I can press down on the grid of blades (see extra blade grid on top of my dough bucket) with my whole forearm and chop a nice amount of olives into the container.  Using my whole forearm gives me more strength.  The container has markings for cups, and comes apart easily.  The Chop Wizard soaks in my dough bucket, after use, for easier cleaning.     
  2. Soak all your tools in your empty dough bucket or a pan when you are finished using them.   That way, you can wash them easily later (or tomorrow!)  Give yourself the permission of time to clean up much later.

Thanks for stopping by to visit! I hope you will leave a comment below. I read every comment, and really appreciate your feedback.   And come back soon, I'll be baking again often.

Judy

Tuesday, September 21, 2010

Quinoa Bread


Yummy Quinoa Baguettes!
Hubby: "What's for dinner tomorrow night, sweetie?"

Me: "I dunno, I didn't make up a menu."
That's when I remembered the quinoa I just purchased, and the Smart Bacon (soy) that I had in the freezer.

Luckily, it's easy to whip up some HB5 quinoa dough one night, and bake baguettes tomorrow. I had seen photos of yummy quinoa baguettes made by our HB5 group leader Michelle, of Big Black Dogs. The baguettes could make some great "BLT" sandwiches. And that's just what I made--the dough was mixed and was rising within just a few minutes.

There weren't enough hours for the dough to rise on the counter before bedtime. Therefore, the dough went into the fridge after 1 1/2 hours. I took it out the next morning to come to room temperature and finish rising.

 The next day, the dough was somewhat stiff. While that made it easy to shape baguettes, I wondered if the raw quinoa had soaked up some of the liquid.

First baguette, and 2 pieces resting after gluten cloak.
Next time a raw grain is part of a recipe, I am considering keeping the dough wetter. After all, my maple oatmeal bread was very wet, and the oatmeal seemed to absorb some of the liquid overnight.

I used the letterfold technique found in the HB5 book, and they came out nice. I had 2 baguettes that were 11oz. each, and a smaller one of 7 oz. each.


The fresh quinoa baguettes made wonderful vegetarian "BLT" sandwiches. 


Now, here's my "while the oven is still hot" recipe. I'm starting to test out holiday gift recipes, and this caught my eye.  A similar recipe came in the King Arthur catalog, but I've adjustment the amounts and ingredients slightly:


Pecan, Chocolate and Caramel candies
(adapted from King Arthur Flour recipe)

 1 ounce pecans
6 caramel candies
16 Dark Cocoa Candy Melts (by Wilton) 
    or other 1" - 1 1/2" bittersweet chocolate disk
sea salt to garnish each candy (if desired)

Preheat the oven to 325 degrees. Unwrap caramels, place on a baking sheet and platter, and put them in a warm area to soften.
Chop pecans; you may need to chop more than 1 ounce in case you get crumbs. Toast chopped pecans. When pecans are toasted, place them into 16 piles (about 1/4oz./2tsp each) of pecans on a parchment-lined or lightly greased baking sheet.

Take caramel cubes and use your fingers to flatten them into disks the size of a half silver dollar. Place them on top of pecans. Heat in the oven for 2 to 3 minutes, until the caramel softens and begins to smell. Remove from oven. Top each cluster with a Candy Melt.

Once the chocolate has softened, top each candy with a few flakes of sea salt (if you like sweet and salty combo). Allow the caramel and chocolate to cool and set before removing candies from the pan.

Makes 16 candies

The candies tasted good.  Next time, however, I might make them in a mini muffin pan to improve the shape.


This bread is one of the breads from the "Healthy Breads in 5 Minutes a Day" book.
The HBinFive Baking Group, started by Michelle of Big Black Dogs, is baking through all of the breads in this book.  To see what my HB5 baking buddies have made recently, check out Big Black Dogs

Thanks for stopping by to visit! Come back soon, I'll be baking again often. I hope you will leave a comment below. I read every comment, and really appreciate your feedback. 

Judy


Monday, September 20, 2010

100% Whole Grain Maple Oatmeal Bread


Maple Oatmeal Bread, mini loaf

There wasn't much time to make this dough, but much time wasn't needed!  That's the beauty of this type of baking.  The most time was spent buying the wheat germ for this recipe and quinoa for the next loaf.

Raisins were added, after hearing reviews of this bread from other group members.  As usual, I rinse my dried fruits to clean them.  This also keeps the fruit from soaking up liquid from the dough.

Dough, next day

The dough was rather wet, but I didn't mind.  I knew that I would be making mini loaves.  


The next day, the dough was stiffer.  It is possible that the raw oatmeal had absorbed some of the liquid.  Still, it wasn't easy to do the gluten cloak.  

We had a lot of plans for the day--building our harvest booth.  So I quickly covered the pans to let them rise, set two timers (one to turn on the oven awhile before actual baking), and went outside to start work on the booth.

I had made half a recipe, and it was just enough for 3 mini loaves.
Ready to rise in mini pans

When the second timer went off, the loaves were put into the oven.  Because they were mini loaves, they would bake sooner.  I kept setting timers for 10 minute intervals, and took them out when the internal temperature said 195 degrees.
Yummy, full of raisins and flavor!
The breads were a really nice snack for all of us building the harvest booth!  Nice crumb and flavor.  My friend, Debbie, said that the raisins really made the loaf!  Even my hubby said that he really liked it.  We all felt the loaf would be great with butter.  Next time, I might add some walnuts.  

I think I'll have another piece right now--excuse me for a minute...

Mmmmm, tastes great with honey butter!

What a great treat to have while we built the booth, and to give a loaf to my friend.  Here's some pictures of our harvest booth: 


Putting up the "walls"


Our crew, the booth all finished.  The "roof" is bamboo mats, so you can see the stars at night.  Peyton, who is 9, is a pro at putting up the lights.  We will be adding Chinese decorations later on, for our Asian theme.


The booth, lit up for night.  We need to add more decorations, a table, chairs, and lots of happy people!  Our friends look forward to this celebration every year!


Handwise tips:  If you have hand pain, tendonitis, or arthritis or any other pain issues and want to make this recipe:  
I guess the best tip for this recipe is to add the dried fruits into the water/dough, when you are making the dough. And rinse the raisins--you will be surprised how dirty raisins can be.

This bread is one of the breads from the "Healthy Breads in 5 Minutes a Day" book.
The HBinFive Baking Group, started by Michelle of Big Black Dogs, is baking through all of the breads in this book.  To see what my HB5 baking buddies have made recently, check out welcome-to-the-19th-hbinfive-bread-braid/">The 19th HBin5 Bread Braid
 
Thanks for stopping by to visit!  Come back soon, I'll be baking again often.  I hope you will leave a comment below.  I read every comment, and really appreciate your feedback.


Judy

Thursday, September 16, 2010

100% Spelt Bread, Plain and Simple


The assigned HB5 group bread was a 100% whole wheat bread, but we had the option to use spelt flour.  There was only enough spelt flour for one bread, and this seemed a good time to bake it.

100% Spelt Bread, Plain and Simple


The dough for this bread seemed quite loose, even after refrigerating overnight.  Our book says that both whole wheat flour and spelt flour weigh the same.  I wonder if they absorb flour the same way.

The next day, the consistency was like our gluten free breads.  The dough  was hard to shape.  I decided to bake the bread in a loaf pan.  The bread is shown above.  It was a nice bread; we really like spelt!

That's the bread, plain and simple.

 Handwise tips:  If you have hand pain, tendonitis, or arthritis or any other pain issues and want to make this recipe,
  1. You might space it out over a few days.  Make the stored dough several days before.  You don't have to bake on the same day, that's the beauty of this dough!
  2. A mixer or food processor can help you.  You could put soapy water in it and run it for a few seconds to help clean it after removing the dough.  
  3. Then, if you are using a food processor, remove the dough hook/blade so that you can fill up the bowl even more.  Put an empty (cleaned)  container from 35mm film upside down, over the center portion and you can fill it up higher to soak. The water shouldn't leak out!
  4. When you shape it, let the dough rest if it resists stretching out.  Wait 10-15 minutes after doing the gluten cloak, and it easily should be able to be shaped.  Good time to have a seat and rest your hands!
  5. Soak your tools in your empty dough bucket or a pan when you are finished using them.   That way, you can wash them easily later (or tomorrow!)  Give yourself the permission of time to clean up much later.


This bread is one of the breads from the "Artisan Breads in 5 Minutes a Day" book.
The HBinFive Baking Group, started by Michelle of Big Black Dogs, is baking through all of the breads in the "Healthy Breads in 5 Minutes a Day" book.  To see what my HB5 baking buddies have made recently, check out  HBin5, 19th bread braid


Thanks so much for stopping by.  I hope that you will leave a comment.  And please stop by again soon, to see what's baking in my kitchen!

Judy 

Friday, September 3, 2010

Baking Swedish and Norwegian Breads


Judy & Kitty Making Norwegian Jukelage, waving Norway's flag


This baking adventure started out with my baking Swedish Limpa Bread from AB5The combination of orange zest, cardomom, anise and rye seemed interesting.  Therefore, I postponed my group's HB5 asssignment for this week.  These breads just couldn't wait to be baked!

While freshly grinding the anise seeds and cardomom pods, from the health food store, the house smelled wonderful!  The dough went into the fridge overnight, to make it easier to handle when shaping. 

Just before the loaf went into the oven, a cornstarch glaze was applied.  A sharp knife was used to cut a scallop pattern into the dough.  More cardamom, anise, and sugar was sprinkled on top.  Here's a picture of the bread, just before it went into the oven.


While eating the loaf for dinner, my husband learned he didn't like the flavors of anise and cardomom.  Well, you can always learn something new about your spouse!

That's when I thought about my friend, Kitty.  I love to talk to people about baking, and about all the baking styles of different countries.  When Kitty and I talked about baking, she mentioned her favorite Norwegian bread--julekage (pronounced yooleekaka).   

Kitty has been extremely busy in her job, and hasn't baked in awhile.  Since the AB5 way of baking might help her, I invited Kitty to bake julekage at my house.  She was excited to see how she could bake the AB5 method.  Julekage is actually a variation of challah, which is in the AB5 book.  We just added raisins (Kitty's choice), cardomom, and anise.


Here's a picture of Kitty, mixing up a batch of dough from the AB5 book.  She enjoyed using my Danish dough whisk.


Two hours later, the dough was ready to be shaped.  Look at that beautiful rise!!!  And the smell of even the dough was wonderful.
That's the flag of Norway on the top of this "dough mountain."


Kitty said that her family makes 3-strand loaves which are sliced.  They are eaten as part of breakfast or dessert.  Kitty learned this shape from her mom, who learned it from her dad's mom.   Kitty said that different families might shape their jukelege differently.  They also make rolls, which are easy to pack for a snack.

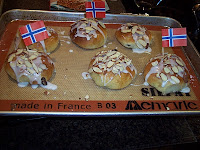
Here's a picture of the rolls, fresh from the oven.  We had measured out 3 ounces of dough for each roll.  


The rolls, after icing them with Kitty's special icing recipe. 


Kitty's Danish Almond Icing
1 cup powdered sugar
2 TBSP water
1 tsp vegetable oil
1/2 tsp almond extract

Mix all the ingredients together.  Add water until it becomes thin enough to drizzle.  Makes 1/2 cup
After drizzling the icing on the jukelage as it cooled, we put almond slivers on the top of the icing as the cooled.

 
The finished, braided loaves. 

Kitty asked her mom how to store the loaves so that the icing wouldn't come off.  Kitty's mom said that people usually eat them up right away--no leftovers!  But she said to store them in a paper bag overnight and then put the paper bags in the freezer bag to freeze them.  That way, the icing shouldn't rub off.

Kitty was thrilled to take home some of the remaining dough to make rolls later in the week.  And we enjoyed some wonderful Norwegian treats!

More Swedish Limpa Bread:

Swedish Limpa Bread
There was still some leftover Swedish Limpa bread dough, so we made another loaf.  It was fun making patterns in this loaf.


For the last pound of limpa bread dough, we decided to make muffins.  Following Kitty's julekage idea, muffins would be packable for a snack.  Here's Kitty, putting a mixture of cardomom, anise, and sugar on top.


The muffins baked up really well.  They only took about 20 minutes to bake.


The spices of cardamom and anise in these breads were fascinating to me.  I have used cardamom in Indian cooking.  How did it get to Sweden?  

Wikipedia gave me an answer.  It just had to do with the ancient spice routes!  The first Dutch expedition left from Amsterdam (April 1595) for South East Asia. Another Dutch convoy sailed in 1598 and returned one year later with 600, 000 pounds of spices and other East Indian products.  How cardamom got to Scandinavia from India

So it was the Dutch who first brought these spices to countries like Sweden, Norway and Holland.

When Kitty came over to bake julekage, she said that her great grandparents owned a shipping company.  They would travel to India and all over the world, bringing spices back to Norway.  Wow, that really brought history to life for me!

Well, we had an absolute blast baking together!  All my husband heard was the two of us laughing and singing ("Let's do the gluten wrap, again!...").  Also, the house smelled wonderful.  While the muffins were baking, Kitty went to feed out koi fish in our pond.  When she returned to the kitchen, she said she was just in love with the wonderful aroma.  It reminded Kitt of Christmas baking from her childhood.  What a wonderful memory!


We hope you have fun baking these breads.  For some helpful Handwise tips, click on this link:  Helpful Handwise tips, near the middle of the page

This bread is one of the breads from the "Artisan Breads in 5 Minutes a Day" book.
The HBinFive Baking Group, started by Michelle of Big Black Dogs, is baking through all of the breads in the "Healthy Breads in 5 Minutes a Day" book.  To see what my HB5 baking buddies have made recently, check out The 19th HBin5 Bread Braid

Thanks for stopping by to visit!  Come back soon, I'll be baking again often.  I hope you will leave a comment below.

Judy


Thursday, September 2, 2010

Zucchini Flatbread


Zucchini Flatbread


What a yummy summertime recipe--fresh parsley, zucchini and green onions.  All combined on a healthier whole wheat crust with parmesan cheese and pine nuts.  The dough was the "100% Whole Wheat Bread, Plain and Simple" from "Healthy Breads in Five Minutes a Day."

I did make two changes, however:
  • White whole wheat, instead of whole wheat flour, was used.
  • Parmesan, not Parmesan-Reggiano cheese, was used. We might try this cheese next time, to see the difference.

This recipe was a bit more work.  The vegetables had to be chopped, grated and sauteed.  

The dough had to be rolled to 1/8" thick.  It was difficult to roll the dough onto my pizza peel, because of the position of the handle.  So I started let the dough stretch by grabbing the top and letting gravity pull it down.  As I went around the edges of the dough, it got pretty large.  There was some rolling at the end, on the back of a floured baking sheet, which is larger than my pizza peel. 

Next time I'll roll the dough out on parchment paper.  The parchment paper can be removed halfway through the baking.  


Here's a picture of the finished zucchini flatbread.  

Those cookies in the background are chocolate with white chocolate morsels.  I don't like to preheat the oven for 30 minutes and then bake at 450 degrees for just 15 minutes of baking!  I had some extra cookie dough left over from awhile back.  It was rolled into a log in was paper before freezing.  All I had to do was slice the cookies while the flatbread baked.


Energy saving and yummy recipes!

Dinnertime!


Handwise tips:  If you have hand pain, tendonitis, or arthritis or any other pain issues and want to make this recipe,
  • Make the dough several days before you bake. The dough used, 100% whole wheat dough plain and simple, can be used up to 10 days after it is made! We still have some dough left, and can make this recipe again really soon.
  • Grabbing the dough at one end, and letting it hang, really helped stretch the dough quickly.  By moving my hands around the edge of the dough, the "rolling out" of the dough went fast.
  • Soak your tools in your empty dough bucket or a pan when you are finished using them.  That way, you can wash them easily later (or tomorrow!)  Give yourself the permission of time to clean up much later 

  •  


  •  


  •  

  •  

  •  

  •  


  • Followup:  I had some leftover dough, and tried rolling it out on parchment.  Several people in our HB5 group suggested that.  While I found it easy to roll out, it was difficult to remove the paper mid-baking.  Still, it was really tasty!


    This bread is one of the breads from the "Healthy Breads in 5 Minutes a Day" book.
    The HBinFive Baking Group, started by Michelle of Big Black Dogs, is baking through all of the breads in this book.  To see what my HB5 baking buddies have made recently, check out The 18th HBin5 Bread Braid

    Thanks for stopping by to visit!  Come back soon, I'll be baking again often.  I hope you will leave a comment below.

    Judy