Sunday, February 14, 2010
Chocolate Expresso Bread
--either I "killed" it, or invented something new! :)
One of the mid-February projects for the "Healthy Breads in Five Minutes a Day" group is to bake a loaf of the Chocolate Expresso Bread recipes in the book.
I ended up making this recipe twice. The first time, I made half a recipe. It never rose, and I don't know why. I am not sure if I used too much salt. I tested the yeast, and it was viable. I wrote my wonderful co-bakers. They reminded me that sometimes it just doesn't pay to try to fix it. So I tossed it, and went on to make the other recipe for the assignment. When that didn't rise, I thought I would try this bread again with a fresh container of yeast.
Other people in the group had mixed results with this bread. I decided to make 1/4th of the recipe--only one loaf. Someone else said their bread turned out like a cookie dough when they did 1/4th of the recipe. I spent a bit of time figuring out if there was a substantial difference between the bakers' percentage method and dividing the recipe in half. There wasn't much of a difference. Well, it was good to practice scaling with bakers' percentage.
I decided to make the bread again this Sunday morning. I love baking, it relaxes me and puts me in another world. But sometimes I try to bake without giving full attention to the recipe.
Everything was ok until I got to the liquids. I was really careful to use the amount I wrote in the column for 1/4th the recipe. I was weighing everything out on my scale.
I decided to use my jar of instant expresso powder, instead of brewed coffee. I was wondering if the brewed coffee in the first recipe was too hot, and killed the yeast. I hadn't used this product since I made a loaf of pumpernickel bread in December, so I decided to read the directions. It said to use 1 rounded teaspoon for 3 ounces of water! AHA! I think I figured out why my pumpernickel loaf in December wasn't dark enough!!! I didn't use enough expresso powder! I had written Jeff and Zoe, the book's authors, in December and we couldn't figure out why the loaf wasn't dark enough. So I figured I would run to the computer and share this discovery on their blog. Big mistake...
When I got back to the baking after posting on their blog, my concentration was broken. I wasn't looking carefully at the "1/4 batch" column of my scribbled pad. After making large batches of dough, a total of 2 1/4cups of liquid didn't seem out of line.
Right after I began mixing the dough, I realized what had happened. It stirred up more like cake batter than bread. Even after adding the chocolate chips (I almost forgot them!) it was thin. I wrote the group on the email list, and got some encouragement to try baking it.
My instinct was to add some baking soda or baking powder and turn this batter into a quick bread. However, I didn't know how those ingredients would react to the yeast that was already in the recipe. I got out my heart shaped pan; it's romantic, chocolate and Valentine's Day. It isn't a non-stick pan, so I sprayed the pan with non-stick spray and hoped for the best. I preheated the oven and baked it until a thermometer registered over 180 degrees. I saw some wet spots, but I think it was the melted chocolate chips.
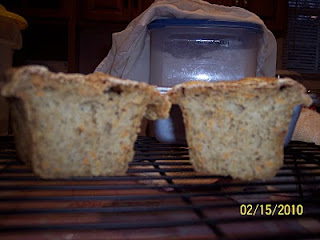
I wish I had been more patient about waiting 10 minutes before trying to take it out of the pan. Maybe the heat of the pan would have loosened the bread. The bread was stuck to the pan. I ran a knife around the edge to loosen it. When I flipped the pan over, the middle was still stuck to the bottom. Only the edge came out.
Here's the bread after it was all removed from the pan:
I noticed that the middle was the moist area. When we ate some of it, it seemed like all the chocolate chips migrated to the bottom middle of the pan.
How did it taste? By itself, we gave the bread a 7 out of 10 rating. A 10 rating is fabulous. We might not make a 7-rated recipe again.
Michelle, our fearless leader, emailed that maybe this recipe might be the basis for a pancake recipe using strawberries and granache. Pancakes might work.
We started taking things out of the fridge to try with the bread. I tried margarine and then strawberry jam. Both were pretty good. My husband (I didn't tell him about Michelle's pancake idea) said, "I wonder how this would taste with maple syrup?" After tasting it with maple syrup, he said it tasted like a chocolate pancake. With any of the additional toppings, we gave it an 8.
We tried it again the next night, after it had cooled completely. The taste wasn't that much different. I had a chance to try it with maple syrup. My hubby said, "it's a brown bread that wants to be a dessert."
With a little work, this could be a fancy chocolate pancake for a Sunday brunch. I think a lot of wonderful inventions happen by "mistake." Well, I am glad I named part of my blog name "test kitchen!" :) . Because if you are learning something from your test, it really isn't a total flop!
If you would like to see the other recipes made by other people in this group, just click on this link:
HBinFive is hosted by Michelle
of Big Black
Dog
Sweet Potato and Spelt Bread
Our first assignment for the mid-February baking project is Red Beet Buns. Although people were making them and commenting how much they liked them, I just couldn't get myself to touch a beet! In addition, I knew my husband wouldn't eat them. We just don't eat beets, peas, or liver in this house. "House rules."
I have never worked with spelt before. I have been anxious to try using it. I bought both regular and white spelt at EarthFare (like Whole Foods).
After posting to the group list and even asking the authors for a substitution, I found this alternate spelt recipe. Sweet potatoes? Yeah, I know that my hubby doesn't like sweet potatoes. But I might be able to disguise that better than beets.
I decided to make half a recipe.
Here's a picture of the shredding of the sweet potato:
I was grateful that I didn't have to peel the sweet potato. For some reason, it wouldn't grate in my Black and Decker food processor. I didn't want to drag out my Cuisinart and make more stuff to wash after that. So I switched to the old fashioned way.
For some reason, this dough just didn't rise. I decided to check the yeast, and it was ok. So I figured that I would try adding 1/2 cup of lukewarm water plus more yeast and maybe it would rise after that. I had to adjust by adding more flour. I added bread flour because it had higher gluten. The dough still didn't rise.
I was concerned how it would taste, because I was serving it for our special Friday night dinner. With four baking assignments per month, I've abandoned also making challah for Friday night.
It was pretty good. My hubby gave it a 9!
I might take the second loaf to my yoga class. Or, I might just bake the extra dough in a loaf pan. When I added flour to the dough after adding the extra yeast and water, it seems I added enough flour to make an extra loaf! If I bake it in a loaf pan, I'll post it here.
I'll definitely try this bread again, but maybe with a new container of yeast. I was getting to the end of my prior bag. Maybe it had lost it's "punch."
________
Update!
I had about ½ pound of this dough left, because I had to add more flour to adjust for the extra yeast. This time, I decided to bake it in a mini loaf pan. I put it in the microwave oven to proof, after heating ½ cup of water in it to make some steam. Here’s how it looked when it was done rising:
Remember when I said I thought this recipe was doomed (kind of how I can't get these fonts to work ok!)? I found I now had problems with my oven. Darn those Thermador ovens! I had just gotten a new computer circuit board for it 2 years ago! I found out this model of that oven goes through circuit boards pretty often. And they aren’t cheap! We inherited this oven when we moved in here.
Is this baking project jinxed?
My oven never did get hot enough to bake this right. And it was getting late! Look at the time--9:21p.m.! By the way, I took a better picture of the time/temp. But it had a reflection of my messy kitchen...
We couldn’t bake the mini pizzas we wanted to make for dinner, either. I thought I would use my toaster oven to bake the pizzas. That’s when I found out my old toaster oven doesn’t really cook at 450 degrees, like it says!
Well, I baked the loaf until it measured 190 degrees +. Pretty to look at, but I found that the top became hard as a rock!
I took the loaf into my yoga class for taste testing. I explained about my baking problems, and we didn’t eat the top.
The all loved this bread, but they really love the garlic bread I made for them last time. I think I'll make that next time I bake, but with whole wheat olive oil dough. If my oven ever gets fixed.
Wow, the repair guys came pretty quickly! Here they are, checking out my oven. It turns out I need a new heating element. That's Anthony and Brian (new trainee, looking from above) from Mr. Appliance. I learned that Bosch makes Thermador and that this can happen over time. I bake a lot, so we use the oven a lot.
The part should be here early next week. I hope it's installed soon! I think I am hooked on baking, and I can't wait to make some garlic loaves again!
HBinFive is hosted by Michelle
of Big Black
Dog
Friday, February 12, 2010
Dixie's Special Garlic Bread
My yoga teacher, Dixie, tried a second garlic bread. The first one was made with the HB5 100% Whole Wheat Sandwich Dough. The second dough was the Master Whole Wheat Dough from HB5.
I made a change--I used half whole wheat and half white whole wheat, rather than all the whole wheat. I just seems to make a lighter bread.
I rolled out the dough, and sprinkled chopped garlic on it--a whole head of garlic! I then drizzled olive oil on the dough, rolled it up, and baked it as a loaf in a pan.
Dixie said this was the best!!! She loved having it with tomato soup on a cold day!
This one is a keeper, and will be nicknamed "Dixie's Special Garlic Bread!" I love how restaurants name sandwiches after people. I want to do the same with my breads. Dixie is a wonderful yoga teacher, and I love sharing my baking creativity with the class. They encouraged me to try healthier bread baking. They are great taste testers.
__________
March 1, 2010
I was so happy when the appliance repair guys came back with my new oven element part! I was very anxious to bake again.
Come to think of it, that's probably why I wore out the first oven element--all the baking! Baking is for my peace of mind.... :) I got on a baking binge of cookies, almond challah and other goodies. For this braid, I decided to revisit Dixie's Special Garlic Bread.
It was really funny last week at yoga class. I walked in to yoga with a bag of yoga things. People saw the bag and thought there was fresh bread in it. Suddenly, they were coming toward me saying "oh, she has bread!" They were so disappointed when I told them my oven had been broken. So, tomorrow, I am bringing this for sure!
Last time, I chopped the garlic with my bench knife. It worked well, but the garlic smell was tough to remove from my bench knife.
This time, I decided to chop the garlic in my mini food processor. I wanted to see if that was faster. I think that chopping 2 heads of garlic is just as fast by hand--less to wash.
I'll just have to find my mom's hand chopper! It will work well with garlic, and will bring back good memories of my mom.
I rolled out just over a pound of dough into a rectangle. Then I drizzed olive oil on it and spread an ounce/one head of chopped garlic all over. It blended really well with the olive oil.
This is really similar to making a cinnamon loaf.
I did the same with a second rectangle.
I rolled the rectangles up into logs and placed them in a loaf pan to rise.
Actually, I think it would be possible for someone to make great garlic rolls this way! Just slice the logs into one inch pieces and set them on their sides. YUM!
Here are the breads, ready to rise. I put them in the microwave to rise for an hour.
Then I'll put them into the fridge overnight to continue rising. That way, I can bake them fresh for yoga class tomorrow!
I removed the loaves immediately, and brushed the tops with olive oil to keep the tops soft. Dixie prefers soft crusts. Here are the loaves, after they were removed from the oven:
Here's a picture of Dixie, my wonderful yoga teacher, with the loaf I named after her:
If you look carefully at the bread, you can see the swirl of garlic throughout the bread. We ate much of this loaf after class, and I ate more of the remainder with lentil soup later. Dixie's Special Garlic Bread is delicious!
If you would like to see other recipes made by other people in this group, just click on this link:
HBinFive is hosted by Michelle
of Big Black
Dog