Showing posts with label parve. Show all posts

Friday, July 15, 2011

Rye Raisin Pecan Bread

I adore the King Arthur Flour recipe for raisin, rye and pecan bread!  The raisins give the bread a wonderful sweetness.  The mixture of rye and white flours gives a more wholesome flavor.

I make some changes to the recipe:
  • One kind of rye flour, the kind found in grocery stores, is used.  I don't want to buy several grinds of flour, like pumpernickel.
  • Oil is substituted for the butter.
  • The first loaf shown is made with all purpose flour.  The second loaf is made with bread flour.

This bread was made several times before, as a freestanding loaf, and in my cast iron pot.  When a fellow seller at the Farmer's Market gave me some of his rye flour to try, I just had to make it into this bread.

It takes 2 days to make this bread, because a starter is made the night before.  The starter contains only 1/8 of a teaspoon of yeast, all purpose flour, and a small amount of water.  The result is a stiff dough, which is placed in a small oiled bowl.  The bowl is covered and left on the counter overnight.

I had planned to take a picture of the starter, twice, but forgot.  Sorry.  You'll just have to try making this wonderful bread!

The next morning, I mixed together the ingredients, except the raisins and pecans.  The dough rose for about an hour.  It was a bit sticky and puffy.  It didn't double in size, which the recipe said was normal.  I used my mixer to add the nuts and raisins.  Some extra flour was added--the recipe called for kneading in the nuts and raisins on a floured surface.  Therefore, this was the time to add extra flour!

The first time, a freestanding loaf was made on my stone.  I wish that I had put the dough in a bowl to rise, so it wouldn't spread out so much:


The second time, the dough rose and baked in a 9" baking pan:

This made a nice round loaf.  However, I'd like a bit more rustic look.

The second bread was a gift for a friend, who did a favor for me.  It was hard to resist, as the aroma was wafting out of the oven. 

My friend just called and said the bread was fabulous--most of the bread never made it home (it was shared with a friend).

Thanks for stopping by.  I hope you will leave a comment, and post what you baked.

Judy

Thursday, October 14, 2010

Jim Lahey's Walnut Raisin Bread

Pan co' Santi--Walnut Bread
I seem to be baking my way through Jim Lahey's book,  "My Bread, The Revolutionary No-Work, No-Knead Method."  This book is so popular, it's surprising that there isn't a group baking their way through it.  Maybe a group should be started?

This recipe caught my eye because of the raisin and walnut combination. Also, it's a wonderfully rustic-looking loaf! It reminded me of his similar olive loaf, which was recently baked.

The dough was quickly put together after dinner one evening, with the intent to bake it the next morning.  The dough is supposed to rise until it's more than doubled in size--about 12 to 18 hours.  It actually rose longer than that, because of errands that needed to be done in the morning.  This is a very forgiving dough.

The dough was placed on a tea towel to rise for 1 - 2 hours, before it was placed in my heated 3.5 quart Tramontina dutch oven.  Jim Lahey recommends that people use a 4 1/2 to 5 1/2 quart pot.  However, that would be too heavy for me.  This pot has been used before, and the bread conformed to the size of the pot.  Recently, I replaced the plastic knob with the Le Creuset stainless steel knob so that the knob could withstand higher temperatures.

The dutch oven was put in the 475 degree oven for 30 minutes, per the recipe.  After that, the lid was removed so the bread could bake 15-30 minutes more.  

After 15 minutes, the bread was checked with a digital thermometer.  It registered over 200 degrees, so the bread was removed from the pot and put on a cooling rack.  

We cut the bread several hours later, when the bread was cool.  I was dissappointed to find that the bread seemed quite cool and damp in the center.  Even though the bread registered done on the digital thermometer, it could have benefitted by baking it longer.

Possibly, using a smaller pot could have impacted the bread. If I remember correctly, the olive bread, made some time back, seems to have had the same problem.  Therefore,  my next Lahey bread will cook a bit longer covered and uncovered next time.

This was a marvelous loaf--we ate it over the weekend.  The low amount of yeast, and the long rise times, really brought out the flavors of the grain, walnuts, and raisins.  It was great plain, with sweet butter, or cream cheese.  It will be interesting to experiment with longer bake times next time.  Possibly, that will help the center cook more completely. 

Thanks for stopping by to visit! Come back soon, I'll be baking again often. I hope you will leave a comment below. I read every comment, and really appreciate your feedback.

Whole Grain Garlic Studded Baguette, Whole Grain Pizza on the Grille

Whole Grain Margherita Pizza

Garlic-Studded Baguettes


For my "Healthy Breads in 5 Minutes a Day" baking group, I felt it was finally time to conquer my fears of making pizza on the grill.  Also, I decided to make my favorite baguettes with a different dough.

We had a choice of several whole grain doughs.  My choice was to try the Whole Wheat with Olive Oil dough again.  The first time I made this dough, it seemed to be a bit loose.  There's now a post-it note on my recipe that reads, "good for flatbreads."  Now that I have more experience, I've begun to adjust these recipes more.  Michelle, our host, is probably smiling about that!


White Whole Wheat flour was used, and slightly less water--about 1/4 cup less.  Using less water seemed to help this time.  The dough seemed firmer.  After the dough rose and was chilled overnight, it was time to bake!  Yaay!!!


Whole Grain Grilled Pizzas
It was time to brave the grill!  I've been  nervous about grilling pizzas.  There's the thought of the dough falling through the grates.  Also, it's my hubby who usually does the grilling, so I don't have much experience in this. He didn't want to do the pizzas.  Lastly, it's close to fire!  Need I say more?

For my first try, I used flour under the dough on the peel.  Lots of flour!  The pizza ended up with a "too much flour" taste.  Next time, I think I'll flour my peel by rubbing flour all over it--not dumping it on top. 

Getting the dough onto the grill was the toughest part.  We have a split grill.  It's great for small amounts of grilling.  You can fire up half the grill for two people, or use both sides for more people.  The problem for this type of grill is that the peel is too big for one side and there's not much "wiggle room."  

The pizza slid into a bunched up mass on the grill, with the side caught off the grill.  Quickly, I nervously straightened out the pizza.  Possibly I can find a smaller peel for the future.

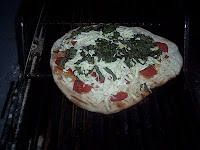
The dough was turned over when it began to bubble up, and olive oil was added.  Then the tomatoes and cheese were added.  We used "Follow Your Heart Vegan Gourmet" cheese.  Closing the lid for a few minutes helped the cheese melt some.
 

The sliced basil was added just before removing the pizza.

A little Wiki research--This is very similar Pizza Margherita, which was made in honor of the Queen consort of Italy--Margherita of Savoy.  The pizza toppings are fresh sliced tomatoes (well, I used canned diced), fresh sliced Mozzarella, and fresh basil leaves. It represents the colors of the Italian flag. It is believed to be the first pizza to use cheese--the pizzas we all know and love today.

There was about 1 1/2 pounds of dough left.  That would be enough for two smaller pizzas.  We decided to give the grilled pizzas another try.  I decided to test out the suggestions of several people in our group.  

Debbie felt that cornmeal works better than flour for sliding the pizzas from the peel.  

Guff and Joanna both felt that flipping the pizza onto the grill worked well. Guff felt that putting the pizza on parchment paper, flipping it so that the paper was on top, and then peeling it off partway through the cooking worked well.

Gwen, from our HBin5 group, agreed that using parchment paper gives good results in grilling.

Joanna mentioned a youtube video of Alton Brown's "Good Eats" show, where he flips the pizza onto the grill.   I am including it here, because there are a lot of great tips--flouring the peel (not overflouring it!), cooking tomatoes, and rolling out the dough.


Also, in this video, Alton Brown shows how to grill a flatbread over a gas burner!  This is wonderful for people who live in an apartment building or otherwise can't do outdoor grilling! He said it would even work for people living in a 5th floor walkup apartment in New York, as long as they have a gas stove.


The experiment--using cornmeal to slid one pizza onto the grill, and putting trimmed parchment paper under the other pizza.  The fire was kept medium low.


The crust that had cornmeal under it on the peel had the same problems as the one with the flour.  I shook the pizza to try to move it to the grill, and it bunched up into a mass over the fire.  Quickly, I moved it back into a larger piece.  But it lost its round shape; it's the one on the plate.


The pizza on the grill is the one that had parchment under it.  It moved easily to the grill, kept its shape, and cooked nicely.  We watched the pizzas carefully.  However, I'll try Guff's method of flipping the pizza crust so that the parchment is on top next time.  That may enable us to use higher heat.

We ate the pizza cooked on the parchment paper that night.  It was wonderful, served with fast totellini soup.


 Baguettes
I've made the garlic-studded baguettes before, and love the garlic-infused flavor from this method. This time, I decided to try omitting the stone or steam.  What would happen?  


letterfold technique
Twelve ounces (a bit larger than recommended) were used.  The baguettes were shaped using the letterfold 
technique, before stretching into a longer baguette.  Whenever there was resistance, I let the dough rest for a few minutes (so the dough wouldn't be so cranky!). 

The baguettes were place on my Silpat, on top of a baking sheet.  They were baked after baking a different bread, and the temperature was about 375 degrees.   After approximately 15 minutes, the breads were taken off the baking sheet and put onto the oven racks to firm up the bottoms.
Soft Crust Garlic-Studded Baguettes
These baguettes were wonderful  with tortellini soup.  I might continue making them this way, and you might want to try it.  For me, baking without adding the hot water and stone is a bit simpler.  Also, it takes less time and energy to heat the oven to a cooler temperature.

Grissini
I had some gluten free olive oil dough in the freezer. It was in the freezer for awhile, but looked fine. I figured it was good for flatbread. What did I have to lose by trying grissini and flatbread with that?!
I rolled 1/2 pound of dough out on parchment on a baking sheet, cut it into a rectangle (re-using the scraps) and drizzled olive oil on top.  The toppings were kosher salt and some leftover spicy spice mix from baking crackers some months back.  Then I cut the dough into strips; I made several groups of strips.  Then it was time to put the grissini in the oven to bake. Halfway thru baking, I took the pan out, separated the strips, (easy) and finished baking them. Easy, and yummy! A lot easier than moving the strips onto a baking sheet.  Crisp, too.


Sorry there aren't any pictures of the spicy grissini, but they went really fast!  So did the 2 pieces of spicy gluten free flatbreads...


Wherever, you are, I hope you are enjoying the beautiful fall colors.  As a former Southern California gal, seeing leaves change colors is new to me.  We just took a drive on the Blue Ridge Parkway to see the beautiful bright red, orange, and yellow leaf colors on the trees.  We were able to see the leaf colors at their peak!  I thought you would enjoy seeing a few of the pictures:

Grandfather Mountain, NC, from the Blue Ridge Parkway
Yours Truly, enjoying the Fall Colors
Grandfather Mountain has a mile-high swinging/suspension bridge which gives breathtaking views. 
Blue Ridge Parkway, Central Section, Moses Cone Memorial Park 

Handwise tips:  If you have hand pain, tendonitis, or arthritis or any other pain issues and want to make this recipe:  
  • My tip for this post is for the pizzas. By cooking two pizzas, we were able to freeze one pizza and eat one for dinner (cook once, eat twice!). 
This bread is one of the breads from the "Healthy Breads in 5 Minutes a Day" book.
The HBinFive Baking Group, started by Michelle of Big Black Dogs, is baking through all of the breads in this book.  To see what Guff, Debbie, Gwen, Joanne, Michelle, and my other HB5 baking buddies have made recently, check out The 21st HBinfive Bread Braid

Thanks for stopping by to visit! Come back soon, I'll be baking again often. I hope you will leave a comment below. I read every comment, and really appreciate your feedback. 

Friday, August 27, 2010

A Healthier Pie Crust

A Healthier Pie Crust


As some of you may know,  I've been going through my stacks of collected recipes.  Some of these recipes go back to the mid 1990's.

My hubby "suggested" that I toss the beloved stack.  However, I told him that I've give myself a year to try as many as possible before tossing the rest.  We have been trying the recipes, a few a week.  Actually, what's happened is that we have found many new favorites!  We both decided to remove the deadline, as long as we tried some new recipes each week.

This pie crust recipe comes from a 1996 Vegetarian Times issue, where the author remakes lemon meringue pie.  The filling is a mixture of lemonade and kudzu to thicken it, which didn't interest me.  

I am guessing the article was saved for the pie crust recipe. And I am glad I saved it!  It is a good tasting "from scratch" recipe,  and not one that uses a lot of butter, margarine, shortening, or sugar.  It's not as flaky as a crust with shortening, but it's a great tradeoff.  My husband gave it a "10", that being the highest score.  However, we don't eat a lot of pies for him to compare.  Still, we both felt it was really good, and light tasting.  Small tradeoffs can add up toward better health and weight management.

If you want to avoid a lot of saturated fats, this is a great recipe.  We hope you enjoy it also:

A Healthier Pie Crust
Adapted from Feb. 1996, issue, Vegetarian Times
Makes one crust

1 Cup             unbleached white flour
1/2 Cup          whole wheat pastry flour
1/4 tsp            salt
1 to 1 1/2 tsp  baking powder (I used a rounded tsp)
4 TBSP          canola oil  (chilled, preferably)
5 TBSP          apple juice, chilled (use 6 TBSP, if needed)

Preheat oven to 350 degrees.  

     ***Sift flours, salt and baking powder.  Add oil, mix lightly with a spatula until oil is absorbed.  Add 5 TBSP apple juice; mix again to form a ball.  Add additional apple juice if necessary.  Knead gently 1 minute, or until smooth.  Flatten dough into a disk shape, cover with plastic wrap and chill 30 minutes in the coldest part of the refrigerator.
     Roll out dough on floured surface, 1 -2 inches larger than a 9" pie pan.  Fit dough into lightly oiled pan, easing dough along sides.  Trim excess to edge of pan, crimp with fork.  Chill 20 minutes or more.  Tightly line bottom of crust with aluminum foil, weight with rice, dried beans or pie weights.  Bake until light brown and crisp, 20 to 30 minutes.  If you want, remove the weights after 15 minutes and bake the crust a bit longer to bake the bottom.  It seemed to make a sturdier crust.
     Cool pie crust on a rack.  Fill as usual.

Note:  ***I made this crust quickly in the food processor.  The dry ingredients were mixed and then the oil.  Finally,  5 TBSP chilled apple juice was added.  A few bursts of the food processor kneaded the dough.  After removing the craggy mixture from the food processor, I formed the dough into a ball.  It didn't seem to need more apple juice, because it held together quite well.  Finally, the dough was flattened into a disk and wrapped in plastic wrap for chilling in the fridge.


  The crust, ready for filling!


My yummy (and first ever) lemon meringue pie!!!  We really enjoyed this pie, and the crust was just right for the light taste.


Thanks for coming by.  Happy Baking!  I would love to hear your comments, so please leave one below.  And don't forget to return soon, for my next post.

Judy

Thursday, June 24, 2010

Whole Wheat Mixed Berry Bread and Muffins

Whole Wheat Mixed Berry Bread and Muffins


Our assignment for the Healthy Bread in 5 Minutes a Day baking group was to make 1/2 batch of Whole Wheat Mixed Berry Bread.  Then we were to bake either a loaf or muffins.

Substitutions:  
  1. Used white whole wheat flour
  2. Made a 1 1/2 pound loaf, instead of a 2 pound loaf, leaving  enough dough for 9 muffins.  I wanted a loaf for dinner, as well as muffins for my hubby's snacks.

I made the dough a few days before baking, using a four-berry frozen fruit mixture of strawberries, blueberries, boysenberries and raspberries.  Isn't this a pretty dough? :


After making the dough, I put it in the


microwave to rise.  First, I put 1/4cup of water to heat in the microwave for a minute.  That creates warm steam, which helps the dough to rise.  

It's hard to tell if my dough has risen very much, if I don't make a whole batch.  So I put a post it note at the top of the dough when I set it to rise. 


Two hours later, you can really tell if it has risen!


First, I made the loaf bread.  I found this dough to be somewhat sticky, so I kept adding more and more flour as I worked with it.  

I wanted a rectangular loaf that would be easy to slice.  I found a folding technique in "A Blessing of Bread--Recipes and Rituals, Memories and Mitzvahs" by Maggie Glezer.  Ms. Glezer has wonderful interviews with long time bakers who share their recipes and baking techniques.  I just love reading stories of the bakers!  And they share their wonderful tips!!  One bagel and bread baker shared his folding method for a loaf of deli rye bread that would be sliced for sandwiches.  Start with a thick rectangle of dough. Then,
      "To shape the loaf, fold opposite edges in to the center of the dough and press the dough to even its thickness (1,2 below).  Roll the dough up from a long (not the folded) end (3,4) to make a log that is about 3 inches in diameter and 9 inches long.  (Basically, you want to make a short fat log so you will have big slices of bread for sandwiches.)  Roll the log back and forth to even it, then place it seam side down on the peel or board."


Then cover them with plastic wrap to rise.


As you can see in the picture below, this method created a uniform rectangular loaf:


I had enough dough left for 9 muffins.  This was just enough to make muffins in the muffin pan my mom gave me when I moved out to my first apartment.  I treasure this muffin pan, as the lack of shine shows a lot of wonderful baking done by my mother and myself:


I put lots of raw sugar on top of the muffins.  When they baked, the sugar made a nice, crackly crust on top.  My hubby is enjoying taking them to work to eat with his coffee.  It's much healthier than many other snacks!


Here's a picture of the interior of the whole wheat mixed berry bread loaf.  Really pretty colors:

We enjoyed this bread in our sunroom with our dinner.  I made the optional honey butter, but it tasted great without it.  

We also had chop salad, baked potatoes (baked along with the breads to save energy!), citrus salmon grilled on cedar planks (The recipe came with the cedar planks, yum!) and cherry pie (special treat for my hubby).

 
 Handwise tips:  If you have hand pain, tendonitis, or arthritis or any other pain issues and want to make this recipe,
  1. You might space it out over a few days.  Make the stored dough several days before.  You don't have to bake on the same day, that's the beauty of this dough!
  2. A mixer or food processor can help you.  You could put soapy water in it and run it for a few seconds to help clean it after removing the dough.  
  3. Then, if you are using a food processor, remove the dough hook/blade so that you can fill up the bowl even more.  Put an empty (cleaned)  container from 35mm film upside down, over the center portion and you can fill it up higher to soak. The water shouldn't leak out!
  4. When you shape it, let the dough rest if it resists stretching out.  Wait 10-15 minutes after doing the gluten cloak, and it easily should be able to be shaped.  Good time to have a seat and rest your hands!
  5. You might use a muffin scoop and a small spatula to remove the dough for muffins.  For some people, that's easier than squeezing the muffin scoop handle.
  6. Maybe making a loaf on 2 separate days.  You don't have to bake it all at once.
  7. Soak your tools in your empty dough bucket or a pan when you are finished using them.   That way, you can wash them easily later (or tomorrow!)  Give yourself the permission of time to clean up much later.
Thanks for stopping by to visit!  I hope you will leave a comment below.  Maybe you can add a handwise or time saving suggestion that will help others?

About the HBinFive Baking Group
The HBinFive Baking Group, started by Michelle of Big Black Dogs, is baking through all of the breads in the Healthy Bread in Five Minutes book. For more information on the HBinFive baking group, check out BigBlackDog.


Friday, March 26, 2010

Milk-Free Ice Cream


Like many people, I have collected tons of recipes over the years. Most of them are filed in notebooks, under their categories. Most of them are ignored, sadly. The notebooks are taking up too much room, along with my cookbooks! My hubby wanted me to throw them out. However, I told my hubby that I would give myself a year to go through as many recipes as possible to cull out what I wanted to save. That year is coming up quickly, at the end of May!

Today, I wanted a non milk recipe for a satisfying cold dessert. I'll be having dinner with a bunch of people, and wanted something different and special. I ran across this recipe for "Non Dairy Ice Cream." I don't even know where I got the recipe, I wrote it down years ago!
>
Here’s the recipe:;
--20oz. of frozen strawberries. You can take fresh, hull them, and partially freeze them if you want. They need to be partially defrosted anyways.
--1 cup sugar
--2 Egg whites 
--2 bananas

Partially thaw strawberries. Combine all ingredients in a large mixing bowl. I mashed it up with a masher, that's my addition to the recipe. Then beat on high until frothy. Freeze overnight to set. Here's a picture of the frozen dessert; I did it in 2 batches, to avoid splashing:


The key is that you need to have freezer space for the large bowl (or two). We had this the other day when I made a "test run." It was delicious, tasted like frothy strawberry dessert. My hubby gave it a "9", only because it didn't taste like milk.


I suppose you could also make this in a graham cracker crust, as a frozen pie!